On RPM based Linux OS, tcpdump can be installed using below yum command
# yum install tcpdump -yWhen we run the tcpdump command without any options then it will capture packets of all the interfaces. So to stop or cancel the tcpdump command, type “ctrl+c” . In this tutorial we will discuss how to capture and analyze packets using different practical examples,
Example:1) Capturing packets from a specific interface
When we run the tcpdump command without any options, it will capture packets on the all interfaces, so to capture the packets from a specific interface use the option ‘-i‘ followed by the interface name.Syntax :
# tcpdump -i {interface-name}
Let’s assume, i want to capture packets from interface “enp0s3”
[root@compute-0-1 ~]# tcpdump -i enp0s3
Output would be something like below,tcpdump: verbose output suppressed, use -v or -vv for full protocol decode listening on enp0s3, link-type EN10MB (Ethernet), capture size 262144 bytes 06:43:22.905890 IP compute-0-1.example.com.ssh > 169.144.0.1.39374: Flags [P.], seq 21952160:21952540, ack 13537, win 291, options [nop,nop,TS val 26164373 ecr 6580205], length 380 06:43:22.906045 IP compute-0-1.example.com.ssh > 169.144.0.1.39374: Flags [P.], seq 21952540:21952760, ack 13537, win 291, options [nop,nop,TS val 26164373 ecr 6580205], length 220 06:43:22.906150 IP compute-0-1.example.com.ssh > 169.144.0.1.39374: Flags [P.], seq 21952760:21952980, ack 13537, win 291, options [nop,nop,TS val 26164373 ecr 6580205], length 220 06:43:22.906291 IP 169.144.0.1.39374 > compute-0-1.example.com.ssh: Flags [.], ack 21952980, win 13094, options [nop,nop,TS val 6580205 ecr 26164373], length 0 06:43:22.906303 IP 169.144.0.1.39374 > compute-0-1.example.com.ssh: Flags [P.], seq 13537:13609, ack 21952980, win 13094, options [nop,nop,TS val 6580205 ecr 26164373], length 72 06:43:22.906322 IP compute-0-1.example.com.ssh > 169.144.0.1.39374: Flags [P.], seq 21952980:21953200, ack 13537, win 291, options [nop,nop,TS val 26164373 ecr 6580205], length 220 ^C 109930 packets captured 110065 packets received by filter 133 packets dropped by kernel [root@compute-0-1 ~]#
Example:2) Capturing specific number number of packet from a specific interface
Let’s assume we want to capture 12 packets from the specific interface like “enp0s3”, this can be easily achieved using the options “-c {number} -i {interface-name}”root@compute-0-1 ~]# tcpdump -c 12 -i enp0s3
Above command will generate the output something like below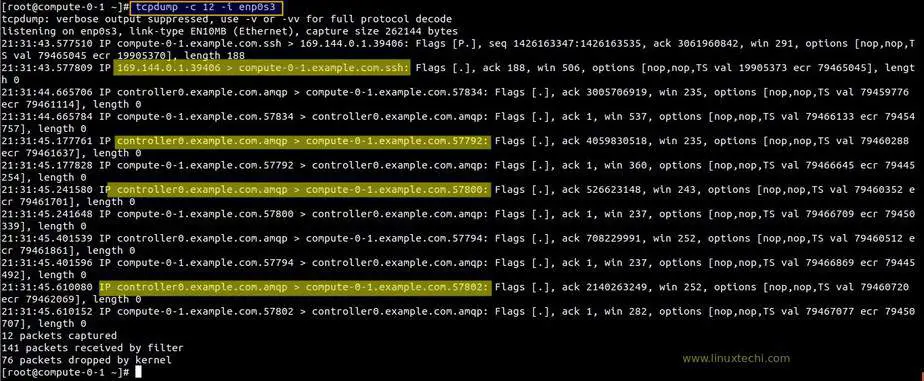
Example:3) Display all the available Interfaces for tcpdump
Use ‘-D‘ option to display all the available interfaces for tcpdump command,[root@compute-0-1 ~]# tcpdump -D
1.enp0s3
2.enp0s8
3.ovs-system
4.br-int
5.br-tun
6.nflog (Linux netfilter log (NFLOG) interface)
7.nfqueue (Linux netfilter queue (NFQUEUE) interface)
8.usbmon1 (USB bus number 1)
9.usbmon2 (USB bus number 2)
10.qbra692e993-28
11.qvoa692e993-28
12.qvba692e993-28
13.tapa692e993-28
14.vxlan_sys_4789
15.any (Pseudo-device that captures on all interfaces)
16.lo [Loopback]
[root@compute-0-1 ~]#
I am running the tcpdump command on one of
my openstack compute node, that’s why in the output you have seen
number interfaces, tab interface, bridges and vxlan interface.Example:4) Capturing packets with human readable timestamp (-tttt option)
By default in tcpdump command output, there is no proper human readable timestamp, if you want to associate human readable timestamp to each captured packet then use ‘-tttt‘ option, example is shown below,[root@compute-0-1 ~]# tcpdump -c 8 -tttt -i enp0s3
tcpdump: verbose output suppressed, use -v or -vv for full protocol decode
listening on enp0s3, link-type EN10MB (Ethernet), capture size 262144 bytes
2018-08-25 23:23:36.954883 IP compute-0-1.example.com.ssh > 169.144.0.1.39406: Flags [P.], seq 1449206247:1449206435, ack 3062020950, win 291, options [nop,nop,TS val 86178422 ecr 21583714], length 188
2018-08-25 23:23:36.955046 IP 169.144.0.1.39406 > compute-0-1.example.com.ssh: Flags [.], ack 188, win 13585, options [nop,nop,TS val 21583717 ecr 86178422], length 0
2018-08-25 23:23:37.140097 IP controller0.example.com.amqp > compute-0-1.example.com.57818: Flags [P.], seq 814607956:814607964, ack 2387094506, win 252, options [nop,nop,TS val 86172228 ecr 86176695], length 8
2018-08-25 23:23:37.140175 IP compute-0-1.example.com.57818 > controller0.example.com.amqp: Flags [.], ack 8, win 237, options [nop,nop,TS val 86178607 ecr 86172228], length 0
2018-08-25 23:23:37.355238 IP compute-0-1.example.com.57836 > controller0.example.com.amqp: Flags [P.], seq 1080415080:1080417400, ack 1690909362, win 237, options [nop,nop,TS val 86178822 ecr 86163054], length 2320
2018-08-25 23:23:37.357119 IP controller0.example.com.amqp > compute-0-1.example.com.57836: Flags [.], ack 2320, win 1432, options [nop,nop,TS val 86172448 ecr 86178822], length 0
2018-08-25 23:23:37.357545 IP controller0.example.com.amqp > compute-0-1.example.com.57836: Flags [P.], seq 1:22, ack 2320, win 1432, options [nop,nop,TS val 86172449 ecr 86178822], length 21
2018-08-25 23:23:37.357572 IP compute-0-1.example.com.57836 > controller0.example.com.amqp: Flags [.], ack 22, win 237, options [nop,nop,TS val 86178825 ecr 86172449], length 0
8 packets captured
134 packets received by filter
69 packets dropped by kernel
[root@compute-0-1 ~]#
Example:5) Capturing and saving packets to a file (-w option)
Use “-w” option in tcpdump command to save the capture TCP/IP packet to a file, so that we can analyze those packets in the future for further analysis.Syntax :
# tcpdump -w file_name.pcap -i {interface-name}
Note: Extension of file must be .pcap
Let’s assume i want to save the captured packets of interface “enp0s3” to a file name enp0s3-26082018.pcap
[root@compute-0-1 ~]# tcpdump -w enp0s3-26082018.pcap -i enp0s3
Above command will generate the output something like below,[root@compute-0-1 ~]# tcpdump -w enp0s3-26082018.pcap -i enp0s3 tcpdump: listening on enp0s3, link-type EN10MB (Ethernet), capture size 262144 bytes ^C841 packets captured 845 packets received by filter 0 packets dropped by kernel [root@compute-0-1 ~]# ls anaconda-ks.cfg enp0s3-26082018.pcap [root@compute-0-1 ~]#Capturing and Saving the packets whose size greater than N bytes
[root@compute-0-1 ~]# tcpdump -w enp0s3-26082018-2.pcap greater 1024
Capturing and Saving the packets whose size less than N bytes[root@compute-0-1 ~]# tcpdump -w enp0s3-26082018-3.pcap less 1024
Example:6) Reading packets from the saved file ( -r option)
In the above example we have saved the captured packets to a file, we can read those packets from the file using the option ‘-r‘, example is shown below,[root@compute-0-1 ~]# tcpdump -r enp0s3-26082018.pcap
Reading the packets with human readable timestamp,[root@compute-0-1 ~]# tcpdump -tttt -r enp0s3-26082018.pcap
reading from file enp0s3-26082018.pcap, link-type EN10MB (Ethernet)
2018-08-25 22:03:17.249648 IP compute-0-1.example.com.ssh > 169.144.0.1.39406: Flags [P.], seq 1426167803:1426167927, ack 3061962134, win 291, options
[nop,nop,TS val 81358717 ecr 20378789], length 124
2018-08-25 22:03:17.249840 IP 169.144.0.1.39406 > compute-0-1.example.com.ssh: Flags [.], ack 124, win 564, options [nop,nop,TS val 20378791 ecr 81358
717], length 0
2018-08-25 22:03:17.454559 IP controller0.example.com.amqp > compute-0-1.example.com.57836: Flags [.], ack 1079416895, win 1432, options [nop,nop,TS v
al 81352560 ecr 81353913], length 0
2018-08-25 22:03:17.454642 IP compute-0-1.example.com.57836 > controller0.example.com.amqp: Flags [.], ack 1, win 237, options [nop,nop,TS val 8135892
2 ecr 81317504], length 0
2018-08-25 22:03:17.646945 IP compute-0-1.example.com.57788 > controller0.example.com.amqp: Flags [.], seq 106760587:106762035, ack 688390730, win 237
, options [nop,nop,TS val 81359114 ecr 81350901], length 1448
2018-08-25 22:03:17.647043 IP compute-0-1.example.com.57788 > controller0.example.com.amqp: Flags [P.], seq 1448:1956, ack 1, win 237, options [nop,no
p,TS val 81359114 ecr 81350901], length 508
2018-08-25 22:03:17.647502 IP controller0.example.com.amqp > compute-0-1.example.com.57788: Flags [.], ack 1956, win 1432, options [nop,nop,TS val 813
52753 ecr 81359114], length 0
.........................................................................................................................
Read More on : How to Install and Use Wireshark on Debian 9 / Ubuntu 16.04Example:7) Capturing only IP address packets on a specific Interface (-n option)
Using -n option in tcpdum command we can capture only IP address packets on specific interface, example is shown below,[root@compute-0-1 ~]# tcpdump -n -i enp0s3
Output of above command would be something like below,tcpdump: verbose output suppressed, use -v or -vv for full protocol decode listening on enp0s3, link-type EN10MB (Ethernet), capture size 262144 bytes 22:22:28.537904 IP 169.144.0.20.ssh > 169.144.0.1.39406: Flags [P.], seq 1433301395:1433301583, ack 3061976250, win 291, options [nop,nop,TS val 82510005 ecr 20666610], length 188 22:22:28.538173 IP 169.144.0.1.39406 > 169.144.0.20.ssh: Flags [.], ack 188, win 9086, options [nop,nop,TS val 20666613 ecr 82510005], length 0 22:22:28.538573 IP 169.144.0.20.ssh > 169.144.0.1.39406: Flags [P.], seq 188:552, ack 1, win 291, options [nop,nop,TS val 82510006 ecr 20666613], length 364 22:22:28.538736 IP 169.144.0.1.39406 > 169.144.0.20.ssh: Flags [.], ack 552, win 9086, options [nop,nop,TS val 20666613 ecr 82510006], length 0 22:22:28.538874 IP 169.144.0.20.ssh > 169.144.0.1.39406: Flags [P.], seq 552:892, ack 1, win 291, options [nop,nop,TS val 82510006 ecr 20666613], length 340 22:22:28.539042 IP 169.144.0.1.39406 > 169.144.0.20.ssh: Flags [.], ack 892, win 9086, options [nop,nop,TS val 20666613 ecr 82510006], length 0 22:22:28.539178 IP 169.144.0.20.ssh > 169.144.0.1.39406: Flags [P.], seq 892:1232, ack 1, win 291, options [nop,nop,TS val 82510006 ecr 20666613], length 340 22:22:28.539282 IP 169.144.0.1.39406 > 169.144.0.20.ssh: Flags [.], ack 1232, win 9086, options [nop,nop,TS val 20666614 ecr 82510006], length 0 22:22:28.539479 IP 169.144.0.20.ssh > 169.144.0.1.39406: Flags [P.], seq 1232:1572, ack 1, win 291, options [nop,nop,TS val 82510006 ecr 20666614], length 340 22:22:28.539595 IP 169.144.0.1.39406 > 169.144.0.20.ssh: Flags [.], ack 1572, win 9086, options [nop,nop,TS val 20666614 ecr 82510006], length 0 22:22:28.539760 IP 169.144.0.20.ssh > 169.144.0.1.39406: Flags [P.], seq 1572:1912, ack 1, win 291, options [nop,nop,TS val 82510007 ecr 20666614], length 340 .........................................................................You can also capture N number of IP address packets using -c and -n option in tcpdump command,
[root@compute-0-1 ~]# tcpdump -c 25 -n -i enp0s3
Example:8) Capturing only TCP packets on a specific interface
In tcpdump command we can capture only tcp packets using the ‘tcp‘ option,[root@compute-0-1 ~]# tcpdump -i enp0s3 tcp
tcpdump: verbose output suppressed, use -v or -vv for full protocol decode
listening on enp0s3, link-type EN10MB (Ethernet), capture size 262144 bytes
22:36:54.521053 IP 169.144.0.20.ssh > 169.144.0.1.39406: Flags [P.], seq 1433336467:1433336655, ack 3061986618, win 291, options [nop,nop,TS val 83375988 ecr 20883106], length 188
22:36:54.521474 IP 169.144.0.1.39406 > 169.144.0.20.ssh: Flags [.], ack 188, win 9086, options [nop,nop,TS val 20883109 ecr 83375988], length 0
22:36:54.522214 IP 169.144.0.20.ssh > 169.144.0.1.39406: Flags [P.], seq 188:552, ack 1, win 291, options [nop,nop,TS val 83375989 ecr 20883109], length 364
22:36:54.522508 IP 169.144.0.1.39406 > 169.144.0.20.ssh: Flags [.], ack 552, win 9086, options [nop,nop,TS val 20883109 ecr 83375989], length 0
22:36:54.522867 IP 169.144.0.20.ssh > 169.144.0.1.39406: Flags [P.], seq 552:892, ack 1, win 291, options [nop,nop,TS val 83375990 ecr 20883109], length 340
22:36:54.523006 IP 169.144.0.1.39406 > 169.144.0.20.ssh: Flags [.], ack 892, win 9086, options [nop,nop,TS val 20883109 ecr 83375990], length 0
22:36:54.523304 IP 169.144.0.20.ssh > 169.144.0.1.39406: Flags [P.], seq 892:1232, ack 1, win 291, options [nop,nop,TS val 83375990 ecr 20883109], length 340
22:36:54.523461 IP 169.144.0.1.39406 > 169.144.0.20.ssh: Flags [.], ack 1232, win 9086, options [nop,nop,TS val 20883110 ecr 83375990], length 0
22:36:54.523604 IP 169.144.0.20.ssh > 169.144.0.1.39406: Flags [P.], seq 1232:1572, ack 1, win 291, options [nop,nop,TS val 83375991 ecr 20883110], length 340
...................................................................................................................................................
Example:9) Capturing packets from a specific port on a specific interface
Using tcpdump command we can capture packet from a specific port (e.g 22) on a specific interface enp0s3Syntax :
# tcpdump -i {interface-name} port {Port_Number}
[root@compute-0-1 ~]# tcpdump -i enp0s3 port 22
tcpdump: verbose output suppressed, use -v or -vv for full protocol decode
listening on enp0s3, link-type EN10MB (Ethernet), capture size 262144 bytes
22:54:45.032412 IP compute-0-1.example.com.ssh > 169.144.0.1.39406: Flags [P.], seq 1435010787:1435010975, ack 3061993834, win 291, options [nop,nop,TS val 84446499 ecr 21150734], length 188
22:54:45.032631 IP 169.144.0.1.39406 > compute-0-1.example.com.ssh: Flags [.], ack 188, win 9131, options [nop,nop,TS val 21150737 ecr 84446499], length 0
22:54:55.037926 IP compute-0-1.example.com.ssh > 169.144.0.1.39406: Flags [P.], seq 188:576, ack 1, win 291, options [nop,nop,TS val 84456505 ecr 21150737], length 388
22:54:55.038106 IP 169.144.0.1.39406 > compute-0-1.example.com.ssh: Flags [.], ack 576, win 9154, options [nop,nop,TS val 21153238 ecr 84456505], length 0
22:54:55.038286 IP compute-0-1.example.com.ssh > 169.144.0.1.39406: Flags [P.], seq 576:940, ack 1, win 291, options [nop,nop,TS val 84456505 ecr 21153238], length 364
22:54:55.038564 IP 169.144.0.1.39406 > compute-0-1.example.com.ssh: Flags [.], ack 940, win 9177, options [nop,nop,TS val 21153238 ecr 84456505], length 0
22:54:55.038708 IP compute-0-1.example.com.ssh > 169.144.0.1.39406: Flags [P.], seq 940:1304, ack 1, win 291, options [nop,nop,TS val 84456506 ecr 21153238], length 364
............................................................................................................................
[root@compute-0-1 ~]#
Example:10) Capturing the packets from a Specific Source IP on a Specific Interface
Using “src” keyword followed by “ip address” in tcpdump command we can capture the packets from a specific Source IP,syntax :
# tcpdump -n -i {interface-name} src {ip-address}
Example is shown below,
[root@compute-0-1 ~]# tcpdump -n -i enp0s3 src 169.144.0.10
tcpdump: verbose output suppressed, use -v or -vv for full protocol decode
listening on enp0s3, link-type EN10MB (Ethernet), capture size 262144 bytes
23:03:45.912733 IP 169.144.0.10.amqp > 169.144.0.20.57800: Flags [.], ack 526623844, win 243, options [nop,nop,TS val 84981008 ecr 84982372], length 0
23:03:46.136757 IP 169.144.0.10.amqp > 169.144.0.20.57796: Flags [.], ack 2535995970, win 252, options [nop,nop,TS val 84981232 ecr 84982596], length 0
23:03:46.153398 IP 169.144.0.10.amqp > 169.144.0.20.57798: Flags [.], ack 3623063621, win 243, options [nop,nop,TS val 84981248 ecr 84982612], length 0
23:03:46.361160 IP 169.144.0.10.amqp > 169.144.0.20.57802: Flags [.], ack 2140263945, win 252, options [nop,nop,TS val 84981456 ecr 84982821], length 0
23:03:46.376926 IP 169.144.0.10.amqp > 169.144.0.20.57808: Flags [.], ack 175946224, win 252, options [nop,nop,TS val 84981472 ecr 84982836], length 0
23:03:46.505242 IP 169.144.0.10.amqp > 169.144.0.20.57810: Flags [.], ack 1016089556, win 252, options [nop,nop,TS val 84981600 ecr 84982965], length 0
23:03:46.616994 IP 169.144.0.10.amqp > 169.144.0.20.57812: Flags [.], ack 832263835, win 252, options [nop,nop,TS val 84981712 ecr 84983076], length 0
23:03:46.809344 IP 169.144.0.10.amqp > 169.144.0.20.57814: Flags [.], ack 2781799939, win 252, options [nop,nop,TS val 84981904 ecr 84983268], length 0
23:03:46.809485 IP 169.144.0.10.amqp > 169.144.0.20.57816: Flags [.], ack 1662816815, win 252, options [nop,nop,TS val 84981904 ecr 84983268], length 0
23:03:47.033301 IP 169.144.0.10.amqp > 169.144.0.20.57818: Flags [.], ack 2387094362, win 252, options [nop,nop,TS val 84982128 ecr 84983492], length 0
^C
10 packets captured
12 packets received by filter
0 packets dropped by kernel
[root@compute-0-1 ~]#
Example:11) Capturing packets from a specific destination IP on a specific Interface
Syntax :# tcpdump -n -i {interface-name} dst {IP-address}
[root@compute-0-1 ~]# tcpdump -n -i enp0s3 dst 169.144.0.1
tcpdump: verbose output suppressed, use -v or -vv for full protocol decode
listening on enp0s3, link-type EN10MB (Ethernet), capture size 262144 bytes
23:10:43.520967 IP 169.144.0.20.ssh > 169.144.0.1.39406: Flags [P.], seq 1439564171:1439564359, ack 3062005550, win 291, options [nop,nop,TS val 85404988 ecr 21390356], length 188
23:10:43.521441 IP 169.144.0.20.ssh > 169.144.0.1.39406: Flags [P.], seq 188:408, ack 1, win 291, options [nop,nop,TS val 85404988 ecr 21390359], length 220
23:10:43.521719 IP 169.144.0.20.ssh > 169.144.0.1.39406: Flags [P.], seq 408:604, ack 1, win 291, options [nop,nop,TS val 85404989 ecr 21390359], length 196
23:10:43.521993 IP 169.144.0.20.ssh > 169.144.0.1.39406: Flags [P.], seq 604:800, ack 1, win 291, options [nop,nop,TS val 85404989 ecr 21390359], length 196
23:10:43.522157 IP 169.144.0.20.ssh > 169.144.0.1.39406: Flags [P.], seq 800:996, ack 1, win 291, options [nop,nop,TS val 85404989 ecr 21390359], length 196
23:10:43.522346 IP 169.144.0.20.ssh > 169.144.0.1.39406: Flags [P.], seq 996:1192, ack 1, win 291, options [nop,nop,TS val 85404989 ecr 21390359], length 196
.........................................................................................
Example:12) Capturing TCP packet communication between two Hosts
Let’s assume i want to capture tcp packets between two hosts 169.144.0.1 & 169.144.0.20, example is shown below,[root@compute-0-1 ~]# tcpdump -w two-host-tcp-comm.pcap -i enp0s3 tcp and \(host 169.144.0.1 or host 169.144.0.20\)
Capturing only SSH packet flow between two hosts using tcpdump command,[root@compute-0-1 ~]# tcpdump -w ssh-comm-two-hosts.pcap -i enp0s3 src 169.144.0.1 and port 22 and dst 169.144.0.20 and port 22
Example:13) Capturing the udp network packets (to & fro) between two hosts
Syntax :# tcpdump -w -s -i udp and \(host and host \)
[root@compute-0-1 ~]# tcpdump -w two-host-comm.pcap -s 1000 -i enp0s3 udp and \(host 169.144.0.10 and host 169.144.0.20\)
Example:14) Capturing packets in HEX and ASCII Format
Using tcpdump command, we can capture tcp/ip packet in ASCII and HEX format,To capture the packets in ASCII format use -A option, example is shown below,
[root@compute-0-1 ~]# tcpdump -c 10 -A -i enp0s3
tcpdump: verbose output suppressed, use -v or -vv for full protocol decode
listening on enp0s3, link-type EN10MB (Ethernet), capture size 262144 bytes
00:37:10.520060 IP compute-0-1.example.com.ssh > 169.144.0.1.39406: Flags [P.], seq 1452637331:1452637519, ack 3062125586, win 333, options [nop,nop,TS val 90591987 ecr 22687106], length 188
E...[.@.@...............V.|...T....MT......
.fR..Z-....b.:..Z5...{.'p....]."}...Z..9.?.......".@<.....V..C.....{,...OKP.2.*...`..-sS..1S...........:.O[.....{G..%ze.Pn.T..N.... ....qB..5...n.....`...:=...[..0....k.....S.:..5!.9..G....!-..'..
00:37:10.520319 IP 169.144.0.1.39406 > compute-0-1.example.com.ssh: Flags [.], ack 188, win 13930, options [nop,nop,TS val 22687109 ecr 90591987], length 0
E..4kS@.@.|+..............T.V.}O..6j.d.....
.Z-..fR.
00:37:11.687543 IP controller0.example.com.amqp > compute-0-1.example.com.57800: Flags [.], ack 526624548, win 243, options [nop,nop,TS val 90586768 ecr 90588146], length 0
E..4.9@.@.!L...
.....(..g....c.$...........
.f>..fC.
00:37:11.687612 IP compute-0-1.example.com.57800 > controller0.example.com.amqp: Flags [.], ack 1, win 237, options [nop,nop,TS val 90593155 ecr 90551716], length 0
E..4..@.@..........
...(.c.$g.......Se.....
.fW..e..
..................................................................................................................................................
To Capture the packets both in HEX and ASCII format use -XX option[root@compute-0-1 ~]# tcpdump -c 10 -XX -i enp0s3
tcpdump: verbose output suppressed, use -v or -vv for full protocol decode
listening on enp0s3, link-type EN10MB (Ethernet), capture size 262144 bytes
00:39:15.124363 IP compute-0-1.example.com.ssh > 169.144.0.1.39406: Flags [P.], seq 1452640859:1452641047, ack 3062126346, win 333, options [nop,nop,TS val 90716591 ecr 22718257], length 188
0x0000: 0a00 2700 0000 0800 27f4 f935 0800 4510 ..'.....'..5..E.
0x0010: 00f0 5bc6 4000 4006 8afc a990 0014 a990 ..[.@.@.........
0x0020: 0001 0016 99ee 5695 8a5b b684 570a 8018 ......V..[..W...
0x0030: 014d 5418 0000 0101 080a 0568 39af 015a .MT........h9..Z
0x0040: a731 adb7 58b6 1a0f 2006 df67 c9b6 4479 .1..X......g..Dy
0x0050: 19fd 2c3d 2042 3313 35b9 a160 fa87 d42c ..,=.B3.5..`...,
0x0060: 89a9 3d7d dfbf 980d 2596 4f2a 99ba c92a ..=}....%.O*...*
0x0070: 3e1e 7bf7 3af2 a5cc ee4f 10bc 7dfc 630d >.{.:....O..}.c.
0x0080: 898a 0e16 6825 56c7 b683 1de4 3526 ff04 ....h%V.....5&..
0x0090: 68d1 4f7d babd 27ba 84ae c5d3 750b 01bd h.O}..'.....u...
0x00a0: 9c43 e10a 33a6 8df2 a9f0 c052 c7ed 2ff5 .C..3......R../.
0x00b0: bfb1 ce84 edfc c141 6dad fa19 0702 62a7 .......Am.....b.
0x00c0: 306c db6b 2eea 824e eea5 acd7 f92e 6de3 0l.k...N......m.
0x00d0: 85d0 222d f8bf 9051 2c37 93c8 506d 5cb5 .."-...Q,7..Pm\.
0x00e0: 3b4a 2a80 d027 49f2 c996 d2d9 a9eb c1c4 ;J*..'I.........
0x00f0: 7719 c615 8486 d84c e42d 0ba3 698c w......L.-..i.
00:39:15.124648 IP 169.144.0.1.39406 > compute-0-1.example.com.ssh: Flags [.], ack 188, win 13971, options [nop,nop,TS val 22718260 ecr 90716591], length 0
0x0000: 0800 27f4 f935 0a00 2700 0000 0800 4510 ..'..5..'.....E.
0x0010: 0034 6b70 4000 4006 7c0e a990 0001 a990 .4kp@.@.|.......
0x0020: 0014 99ee 0016 b684 570a 5695 8b17 8010 ........W.V.....
0x0030: 3693 7c0e 0000 0101 080a 015a a734 0568 6.|........Z.4.h
0x0040: 39af
.......................................................................
That’s
all from this article, i hope you got an idea how to capture and
analyze tcp/ip packets using tcpdump command. Please do share your
feedback and comments.
Share